
What Are Docker and Containers? Why Do We Need Them, and How Do You Get Started?
August 13, 2026
A reader previously mentioned in our content request form that E+ did not seem to have much content about Docker and containers. In response, we will be publishing a series of articles that starts with the basics of Docker and containers, then moves into practical usage.
In this first article, we will introduce what Docker and containers actually are, why so many projects use them today, and what problems they solve. We will also use the simplest possible example so that readers who have never used Docker before can get started quickly.
What are Docker and containers? Why use Docker?
Most people have heard that Docker is a platform and set of tools for building and running containerized applications. But what exactly is a container? The idea is similar to a shipping container in the physical world: it is a box. The difference is that, in software, the box contains an application.
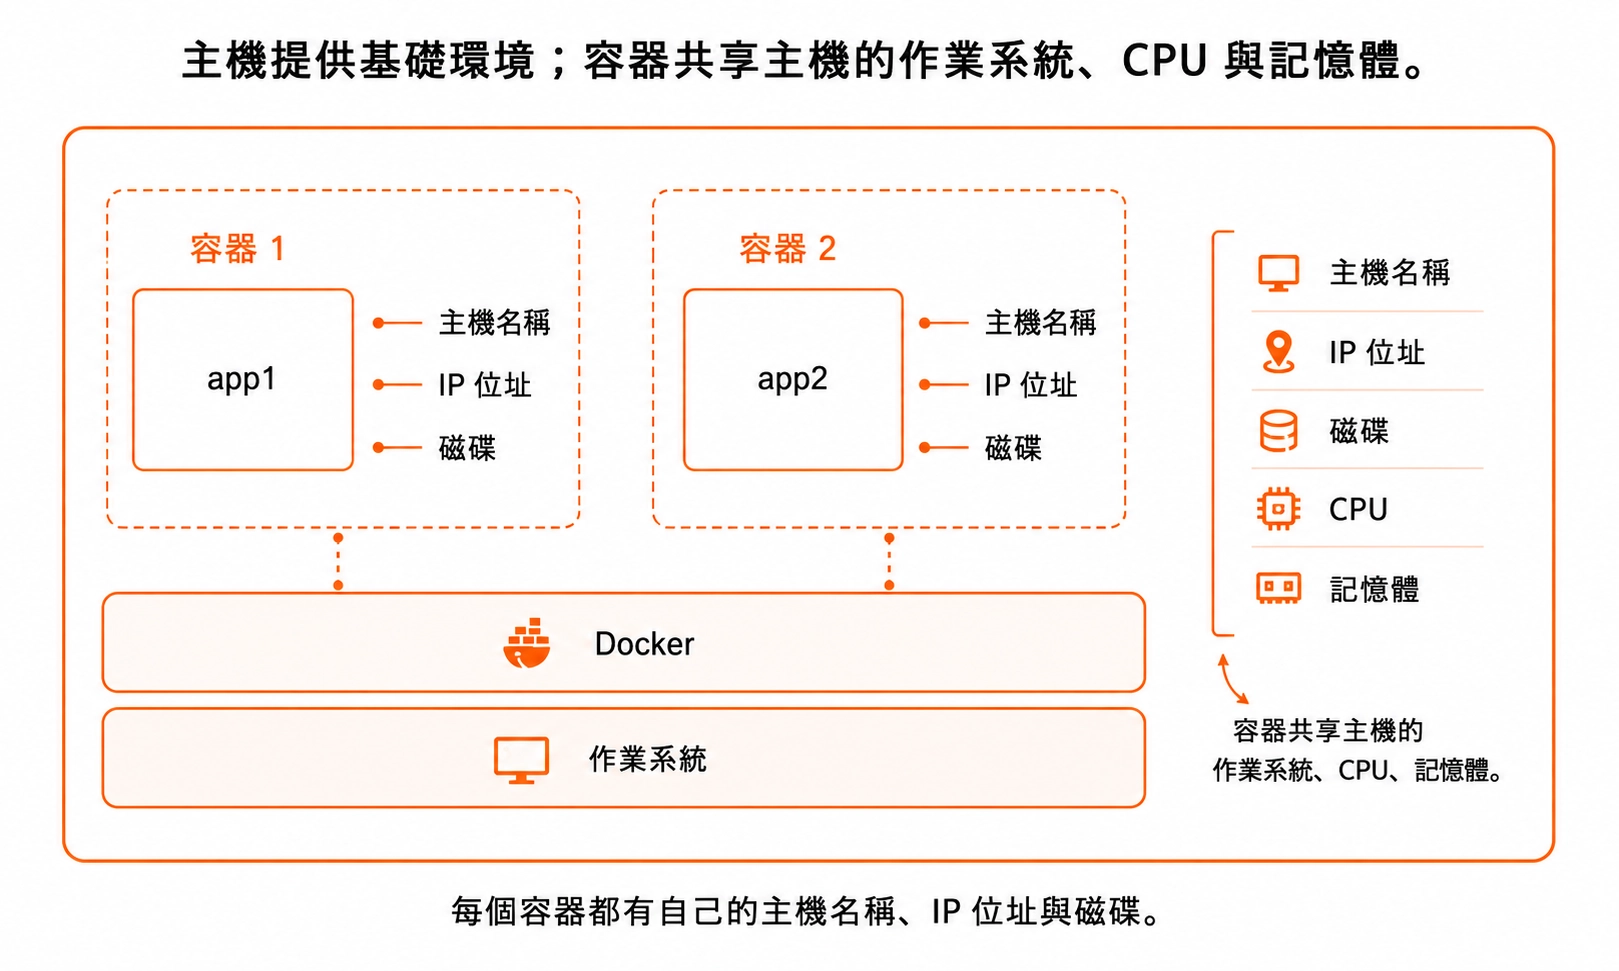
Inside this box, the application gets a relatively independent runtime environment, including things like a hostname, IP address, and disk. These are virtual resources created by Docker. Through Docker's management, these resources are combined into an environment where the application can run.
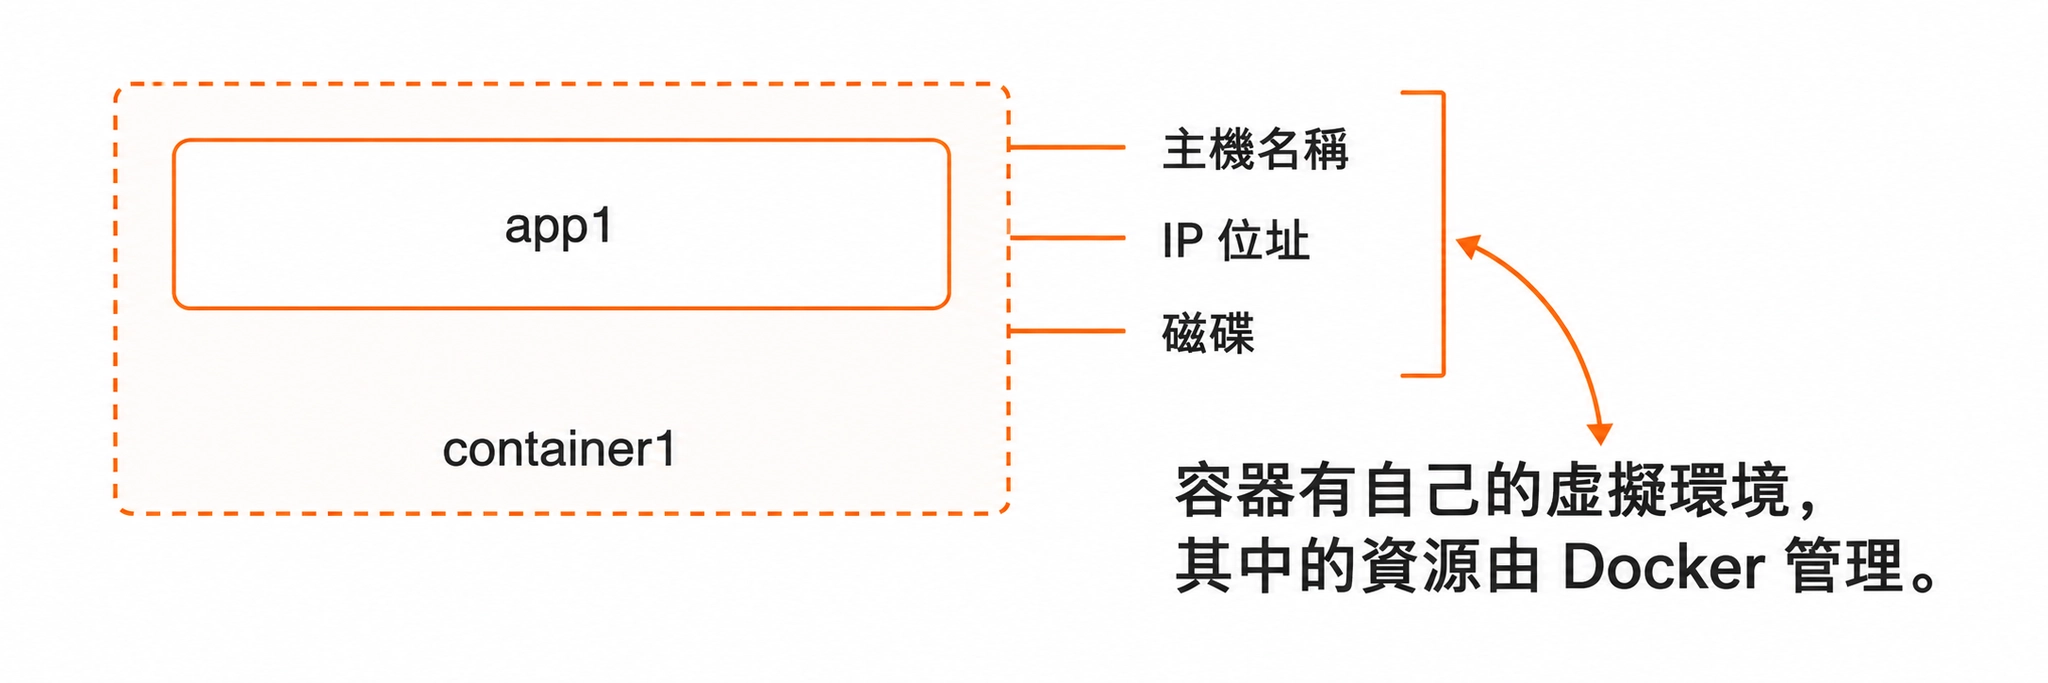
On a single computer, multiple containers use the same CPU, memory, and other hardware resources, and they share the underlying operating system kernel. However, each container still has its own processes, file system, and network environment, so applications inside containers can be isolated from one another.
What problem does Docker solve?
After seeing what Docker does, its value may still not feel obvious. So in this section, let's look more directly at the problem Docker solves.
In the explanation above, we mentioned that containers provide an environment where an application can run. That environment is the key. In software development, writing code is only one part of the work. To actually run the code, you need a compatible runtime environment. Because machines differ, package versions differ, and many other factors can vary, a project may run on your coworker's computer but fail on yours.
Before Docker became common, some people would join a new team and spend a lot of time just trying to get a project running. When they asked teammates for help with setup issues, they would often hear things like, "This project needs Node.js 18, but you installed Node.js 22, so it won't run," or "Your Postgres version is different, which is why the behavior is inconsistent."
With containers, we can package the runtime environment an application needs and run it in a relatively consistent way across different machines. When a new team member joins, Docker can make project setup, deployment, and management much smoother. No matter which machine they use or which dependency versions are installed locally, they can pull down the source code, run one command, and build and start everything locally through Docker. This removes a lot of the time that used to be spent setting up development environments. The premise, of course, is that the team has already prepared the Dockerfile, Compose configuration, and required initialization flow properly. We will cover those concepts in later articles.
This property is why modern applications can run easily in the cloud, in data centers, and even inside serverless functions. Regardless of the architecture or technology stack behind an application, Docker can be used to build, deploy, and manage it.
Why did Docker replace earlier solutions?
The runtime environment created by Docker containers lets multiple applications run at the same time even if they depend on different versions of the same tools. Two applications can use different Node.js versions without conflicting with each other. Before Docker existed, the industry already had ways to solve this kind of problem.
The most widely used approach before Docker was the virtual machine (VM). Conceptually, virtual machines and containers are similar: both provide a box where an application can run. The difference is that a virtual machine's box includes an operating system, so two virtual machines do not share the host operating system.
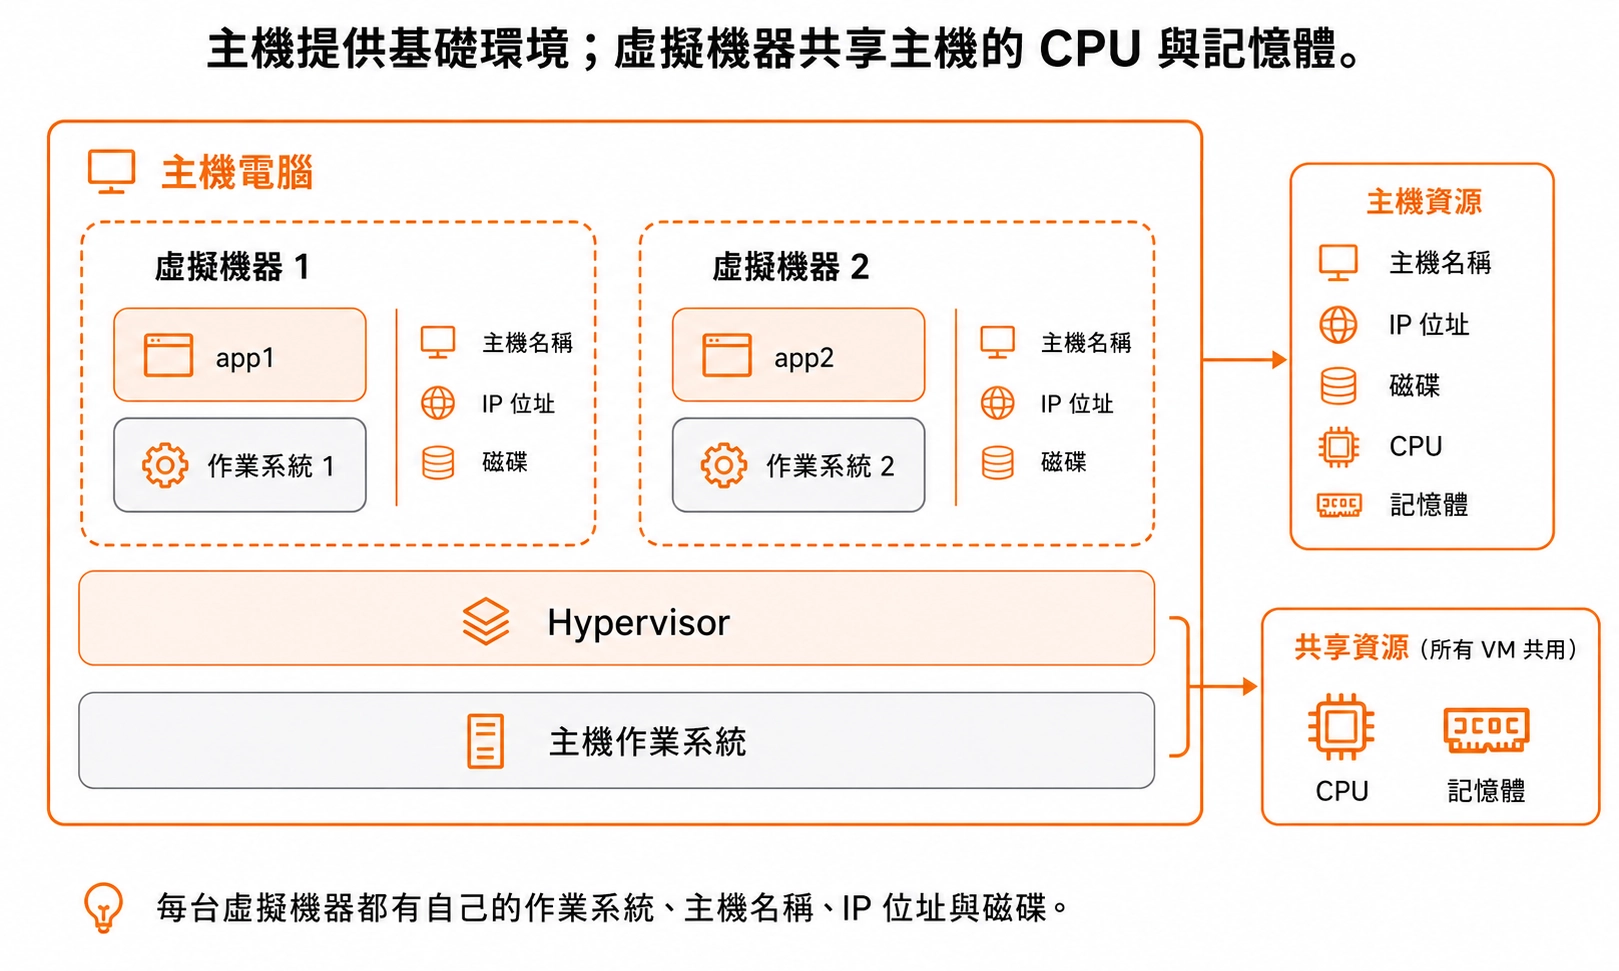
An operating system can consume several GB of memory and a large amount of CPU time. Not sharing an operating system means resources that could have been used by applications are instead taken up by the operating systems inside the virtual machines. As a result, with the same hardware resources, fewer applications can run concurrently when using virtual machines.
By contrast, Docker containers also provide isolation, but they share the operating system of the machine running the containers. This makes containers relatively lightweight. Given the same hardware, you can usually run many more application instances with containers than with virtual machines.
Getting started with Docker through the simplest example
If you want to use Docker locally, the easiest path is to install Docker Desktop or a community alternative. In our own experience on Mac, OrbStack is a strong alternative. It is lighter and faster, covers most everyday Docker needs, and is free for personal use.
After downloading and installing Docker Desktop or an alternative, enter this in your terminal:
docker --version
You should see something similar to this:
Docker version xx.x.x, build xxxxx
To test whether Docker can run, use this command in your terminal:
docker run hello-world
If this is your first time using Docker, you may see:
Unable to find image 'hello-world:latest' locally
latest: Pulling from library/hello-world
After the download completes, you should see output like this:
Status: Downloaded newer image for hello-world:latest

Hello from Docker!
This message shows that your installation appears to be working correctly.

To generate this message, Docker took the following steps:
 1. The Docker client contacted the Docker daemon.
 2. The Docker daemon pulled the "hello-world" image from the Docker Hub.
    (arm64v8)
 3. The Docker daemon created a new container from that image which runs the
    executable that produces the output you are currently reading.
 4. The Docker daemon streamed that output to the Docker client, which sent it
    to your terminal.

To try something more ambitious, you can run an Ubuntu container with:
 $ docker run -it ubuntu bash

Share images, automate workflows, and more with a free Docker ID:
 https://hub.docker.com/

For more examples and ideas, visit:
 https://docs.docker.com/get-started/
Finally, run docker container ls --all, and you should see something similar to the following:
CONTAINER ID   IMAGE         COMMAND    CREATED         STATUS                     PORTS     NAMES
XXXXXXXXXXXX   hello-world   "/hello"   3 seconds ago   Exited (0) 2 seconds ago             goofy_ride
Reviewing what just happened
In the flow above, we ran docker run hello-world. We can break this command into three parts.
The first part is docker, Docker's command-line tool. It is the entry point you use in the terminal to communicate with Docker. In the future, whenever you want Docker to do something, your command will usually start with this.
The second part is run. run creates and starts a container. In other words, this command does more than simply execute something. If the required image is not available locally, Docker downloads it first, which is why you see Unable to find image 'hello-world:latest' locally latest: Pulling from library/hello-world. Then Docker creates a new container from that image and starts the default program inside the container.
The third part, hello-world, is the image name. Images are one of the most important concepts in Docker. You can think of an image as a template for a container. It may include basic operating system files, but not an independent operating system kernel, along with a programming language runtime, system packages, application code, and the default command to run. Docker uses this template to create a runnable container.
After the command finishes, you will see output beginning with Hello from Docker! This message shows that your installation appears to be working correctly. That means your Docker installation appears to be working.
The rest of the message describes several things Docker did behind the scenes:
- First,
The Docker client contacted the Docker daemon.This means Docker's client, thedockercommand-line tool, contacted the daemon that actually does the work behind Docker. - Second,
The Docker daemon pulled the "hello-world" image from the Docker Hub. The Docker daemon fetched thehello-worldimage from Docker Hub. Docker Hub is Docker's official container image registry. Its role is similar to a package registry in the Docker ecosystem, like npm registry for Node, RubyGems for Ruby, or crates.io for Rust. Docker Hub contains many images uploaded by others that you can download and use. - Third,
The Docker daemon created a new container from that image which runs the executable that produces the output you are currently reading.This is the step described earlier: Docker creates a container from an image. - Finally,
The Docker daemon streamed that output to the Docker client, which sent it to your terminal.Docker streams the output produced by the container back to the Docker client.
To understand the final step, you need to know about two components: Docker CLI and Docker daemon. Docker daemon (dockerd) is the background process responsible for creating and managing images, containers, networks, and so on. Docker CLI (docker) is the command-line tool used by the user. It sends commands like docker run to the daemon through the Docker API.
Note: Docker Engine is the umbrella term that includes Docker daemon, Docker API, and Docker CLI.
The relationship between images and containers
We mentioned images above. Since images and containers are two of the most important concepts in Docker, let's close this article by looking more closely at their relationship.
As mentioned earlier, an image can be understood as a template for a container. Conversely, a container can be understood as a running instance created from an image. As an analogy, an image is like a cake mold, and a container is the actual cake baked from that mold. You can use the same image to run many containers.
If you want to run an environment with Node.js 20, you can use docker run node:20. When you enter this command in the terminal, Docker downloads the node:20 image and starts the container.
For example, you can enter:
docker run -it node:20
This opens a Node.js 20 runtime environment in your terminal, and you can use Node.js directly there. For example, in the screenshot below, after entering docker run -it node:20, you get Welcome to Node.js v20.20.2, and can then write JavaScript in the terminal.
!CleanShot 2026-06-20 at [email protected]
Here we added -it. For the official node image, if you do not add -it, the container starts briefly and then exits. From the container's perspective, without an interactive terminal environment, there is no input and no interactive mode, so there is nothing to do and the container exits. This does not mean every container needs -it. For example, containers running web servers or databases keep running as long as their main process is still active.
The -it option is a combination of two flags:
imeans interactive. It keeps standard input open so the user can interact with the container. In other words, if you want to type into the container, you need this flag.tmeans tty. It allocates a pseudo-TTY. You can think of this as making the command-line environment inside the container behave more like a normal terminal, with prompts and interactive behavior.
So docker run -it node:20 is equivalent to docker run --interactive --tty node:20.
Earlier, we said an image is like a template, and you can use one image to create multiple containers with the same environment. If you open multiple terminal tabs and run docker run -it node:20 in each one, you can start multiple independent Node.js 20 runtime environments on your machine.
Taking this further, you can open one terminal tab and run docker run -it node:20, another tab and run docker run -it node:18, and a third tab and run docker run -it node:22. This gives you three independent Node.js runtime environments with different versions, all running locally without interfering with one another.
Remember the setup problem mentioned at the beginning: new members joining engineering teams often run into version issues while installing development environments, causing setup failures or conflicts. With Docker, you can start different containers for different environments. Even if your local machine has Node.js 18 installed, you do not need to worry about conflicts when a project requires Node.js 20.
Summary
In this article, we introduced why Docker is useful, walked through the simplest hello-world example for using Docker locally, and explained the relationship between key concepts such as images and containers.
Earlier, we mentioned that when you run docker run node:20, Docker Engine fetches the corresponding image from Docker Hub, Docker's official public image repository. But Docker images do not only exist on Docker Hub. If you want to customize a development environment, you can also build your own image. In the next article in this series, we will discuss how to do that.
Support ExplainThis
If you found this content helpful, please consider supporting our work with a one-time donation of whatever amount feels right to you through this Buy Me a Coffee page.
Creating in-depth technical content takes significant time. Your support helps us continue producing high-quality educational content accessible to everyone.