4-6 Building Your First MCP Server
May 12, 2025
This article is part of our Cursor workflow series for engineers.
Let me show you how to build your first MCP server, starting with the basics and working up to real-world examples.
Understanding MCP Architecture
The MCP architecture consists of four main components working together:
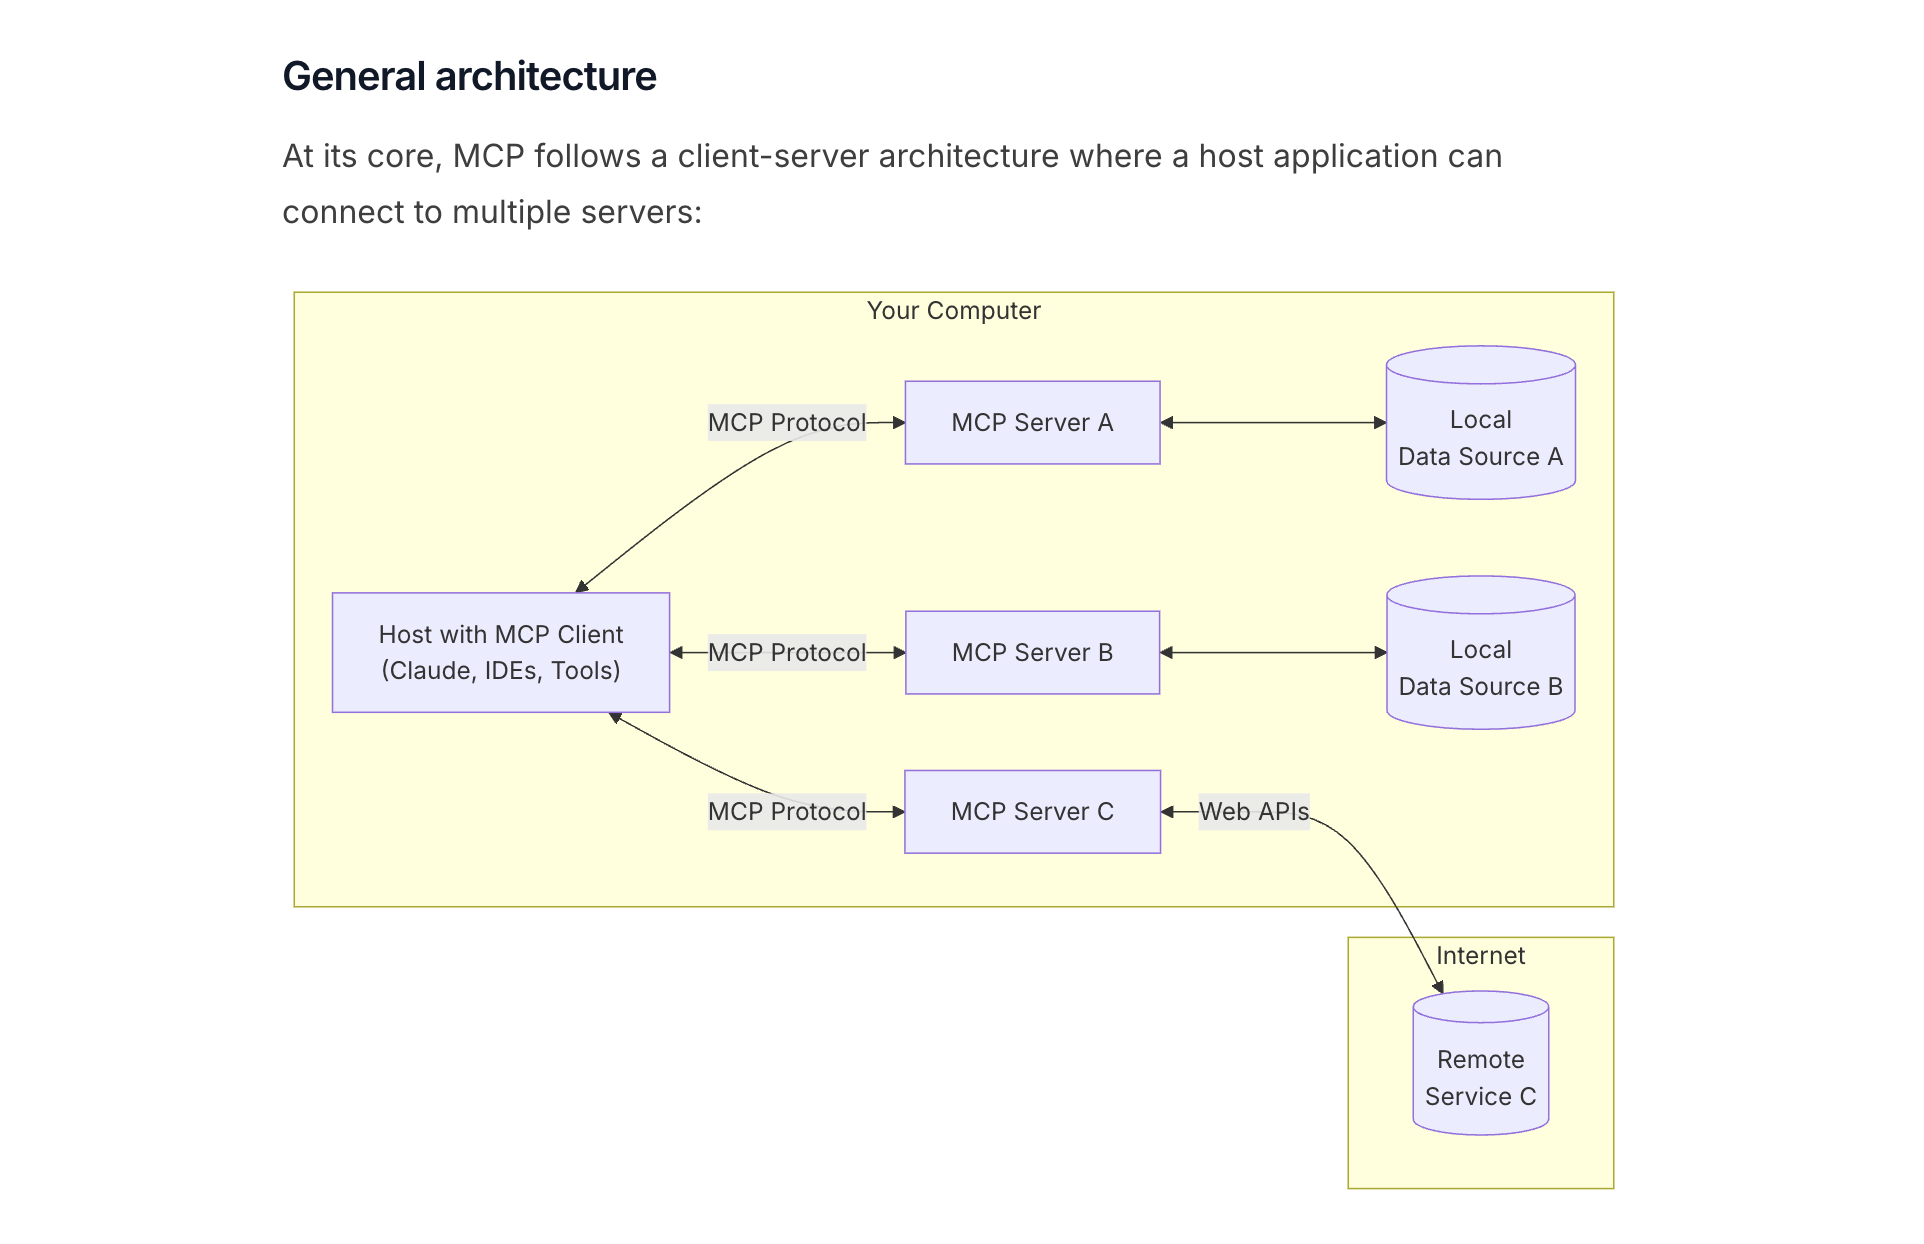
MCP Client handles communication with MCP servers. Think of it as a translator that speaks both AI and MCP.
MCP Host manages multiple MCP clients. When you use Cursor, it acts as the MCP host, coordinating different MCP connections behind the scenes.
MCP Server connects to your data sources and tools, exposing them through the MCP protocol.
Data Sources can be anything from local SQLite databases to remote APIs like GitHub or weather services.
One MCP host can manage multiple servers, each connecting to different data sources. This means you can have one server for your database, another for weather data, and a third for GitHub operations—all working together in Cursor.
Building a Simple Weather Server
Let's start with a practical example. The MCP team provides an excellent quickstart guide with a weather server example. I'll walk you through building it step by step.
Setting Up the Project
First, create a new directory and initialize a Node.js project:
mkdir weather-mcp-server
cd weather-mcp-server
npm init -y
Install the required dependencies:
npm install @modelcontextprotocol/sdk zod
npm install -D @types/node typescript
The @modelcontextprotocol/sdk package handles all the protocol complexity. The zod library helps with parameter validation, making your server more robust.
Writing the Server Code
Here's the complete weather server implementation:
import { McpServer } from "@modelcontextprotocol/sdk/server/mcp.js";
import { StdioServerTransport } from "@modelcontextprotocol/sdk/server/stdio.js";
import { z } from "zod";

const server = new McpServer({
  name: "weather",
  version: "1.0.0",
});

server.tool("getWeather", { city: z.string() }, async ({ city }) => {
  // In a real implementation, you'd call a weather API
  // For now, we'll return a mock response
  return {
    content: [
      {
        type: "text",
        text: `The weather in ${city} is sunny and pleasant, perfect for outdoor activities.`,
      },
    ],
  };
});

const transport = new StdioServerTransport();
await server.connect(transport);
The code does three key things:
- Creates an MCP server instance with a name and version
- Defines a
getWeathertool that accepts a city parameter - Connects the server to stdio transport for communication
Testing Your Server
To test the server in Cursor, you'll need to configure it in your MCP settings. Once configured, you can ask Cursor: "What's the weather like in Tokyo?"
Cursor will automatically find your getWeather tool, pass "Tokyo" as the city parameter, and display the response.
Here's the complete flow:
- User asks Cursor about weather in a specific city
- Cursor finds the
getWeathertool in available MCP servers - The AI model extracts the city name from the question
- MCP client sends the parameter to your server
- Your server processes the request and returns weather data
- Cursor formats and displays the result
Real-World Example: GitHub Integration
The weather server shows the basics, but let's look at something more practical. The official MCP servers repository includes a GitHub MCP server that demonstrates how to wrap existing APIs.
The GitHub server follows the same pattern as our weather example, but instead of mock data, it makes actual API calls:
The difference is in the tool implementation. Instead of returning mock text, the GitHub server:
- Validates the input parameters
- Makes authenticated requests to GitHub's API
- Formats the API response for the MCP client
- Returns structured data that Cursor can display
This pattern works for any API. You create tools that accept parameters, call your API, and return formatted results.
Key Takeaways
Building MCP servers is straightforward once you understand the pattern.
The real power comes from connecting AI tools to your existing systems. Whether you're integrating with internal APIs, custom databases, or third-party services, the MCP server pattern remains the same.
The weather example might seem simple, but it demonstrates the foundation for much more complex integrations. Once you understand this pattern, you can build MCP servers for any data source or API your team uses.
Support ExplainThis
If you found this content valuable, please consider supporting our work with a one-time donation of whatever amount feels right to you through this Buy Me a Coffee page.
Creating in-depth technical content takes significant time. Your support helps us continue producing high-quality educational content accessible to everyone.